**The posts I write might contain affiliate links or be written in collaboration with businesses or brands. Please see my disclosure policy for more information.**
I would say there’s a pretty hefty chunk of people who are actively using Pinterest and could even be considered “Pinterest savvy.” But there’s just as many folks who have not yet dipped their toe into the love, joy, fun, and straight-up addiction that is Pinterest. In my business travels, it seems I run into at least one person a month who responds, “Yeah, yeah. I know I need to be on Pinterest” to my inquiry.
So with that in mind, I thought I would dial it back a bit. Start from scratch. Start with “Square One” for those Pinterest newbies out there.
In this tutorial, I’m going to show you how to start creating your boards, pinning, repining and more. Before you dive right into Pinterest, there are probably a few terms that you need to know, so let’s start with those:
Terminology
- Boards: Think of these as cork or pin boards, much like you may have or have had in real, but now they’ve gone virtual. You can set up topic-specific boards and add pictures that are relevant to those boards. For example, you might create a “Places I Want to Travel Board” or a “St. Patrick’s Day Dinner Party” board. How general or specific you want your boards to be is completely up to you.
- Pin: The main idea with Pinterest is to “pin” pictures to your boards. Pin is used both as a noun (what you put on your board is a “pin”) and a verb (the act of putting a picture on a board is “pinning”). For example, you might pin a picture of The Great Wall in your “Places I Want to Travel Board”
- Repin: When you see someone else’s pin that you like, you can “repin” it and place the picture on an appropriate board of your own. It’s a way of showing appreciation for a great find by another Pinterest member and it also helps you create an even better board for yourself.
- Like : If you see a pin that you like, but it doesn’t necessarily fit into your own boards, you can click a button to “Like” it. It helps you show appreciation for other people’s pins and Pinterest also keeps track of all your “Likes”, so you can refer to them later on.
- Comment: You can also leave a comment on other people’s pins or respond to comments on your own pins.
Repin, Like and Comment
You can find great images, by viewing the pins of other members. Whether you look at the public timeline or people you’re following, you can participate in Pinterest by repinning, liking or commenting on their pins. Here’s a walkthrough of those functions.
Hover over any pin, you’d like to repin and you’ll see 3 options.
- Pin It
- Send
- Heart icon
Choose “Repin” to share, click the “heart” icon for a virtual high-five on any image you like, or “Send” if you want to share with someone via email.
Now that we’ve got that out of the way, let’s get started.
Create a Board
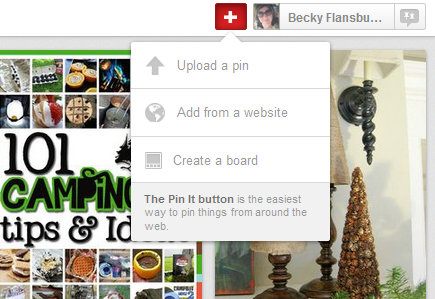
You can add a board to your account anytime. To create one, click the “Add+” button in the site’s top right menu by your thumbnail picture. This will present a drop-down menu that includes “Add a Board” and “Add a Pin.”
Next, you’ll get the choice of adding a pin, uploading a pin or creating a board. For now, we are just going to create a board.
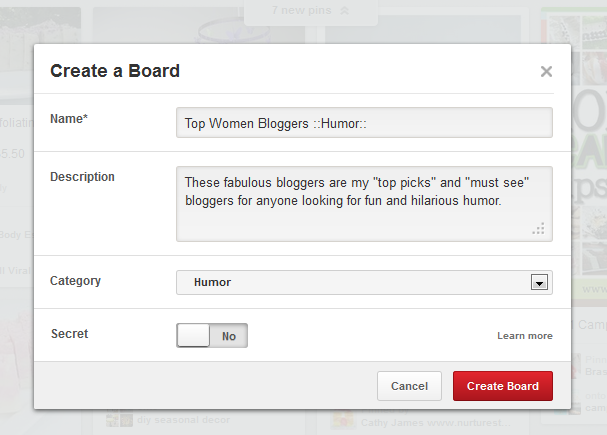
Next, you can create a name for your board,give it a description, and select a category. When you are done, click Create Board.
Start Adding Pins
Go back to the “+” by your thumbnail photo and select Upload a Pin. This give you the option to add Pins from your computer’s picture file.
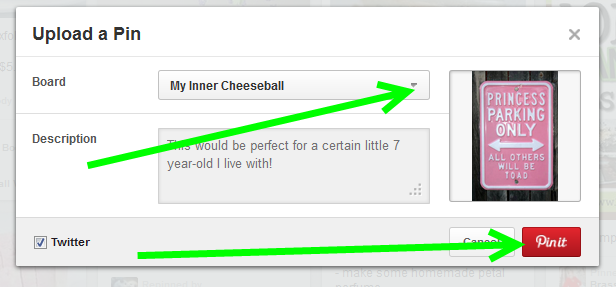
Once you’ve selected you picture, you need to make sure to direct it to Pin to the correct board. Click the arrow and choose the Board you wish the Pin to appear no, give it a good description, and click “Pin It” to add.
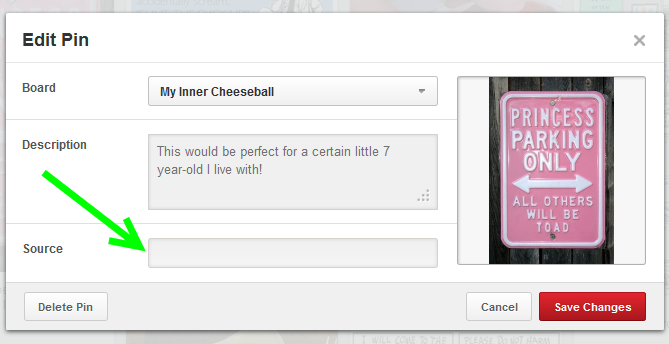
Note: If you Pin an image this way it will not automatically lead Pinterest users anywhere if it was to be clicked on. One main goal of Pinning on Pinterest is to drive traffic to your site or blog. If you’ve uploaded a photo from your database that is related or connected to your blog or site, you will need to go back and Edit your photo so it leads to your website or blog.
 Go back to Pinterest’s home page. Your fresh new Pin should be right there. Mouse over the top corner of your Pin and click the pencil icon. This will allow you to add or change a description AND add a url.
Pinning from the “Pin It” Button on Your Browser
The “Pin It” button is the easiest way to pin from a website, so I recommend you set it up. To add it, go to http://pinterest.com/about/goodies/ and find the “Pin It” Button. All you do is drag and drop that button into the bookmarks toolbar near the top of your browser.
That’s Pinterest in a nutshell. As you can see it can be loads of fun to pin stuff. It can help you get organized, find your creativity and introduce you to people who share similar interests.
Need some help creating simple (but very shareable) images like to use for your brand-spankin-new Pinterest Boards? Fabby free tools like PicMonkey allows people with no Photo Shop experience (like me) to create some pretty fun, vibrant, and pinnable images just for Pinterest.
I’ve spent hours and hours on PicMonkey testing, experimenting and creating shareable images for blog posts and social media. I’ve rolled everything I’ve learning thusfar into one easy-to-understand (but thorough) how-to ebook, complete with over a dozen screenshots, to walk you through the process of creating your own images on PicMonkey. Creating Awesome and Shareable Images with PicMonkey! is an investment (a very reasonable one) in your business/blog marketing on Pinterest efforts. Get the scoop on this ebook HERE.
